
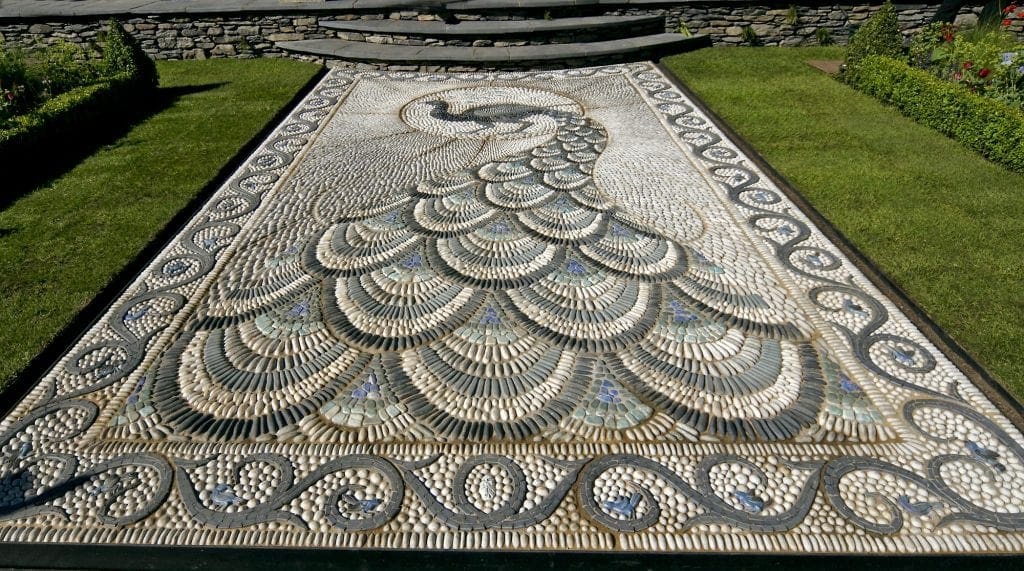
How to Make a Beautiful Pebble Mosaic in Your Garden
Whether you collect your own stones or have a few bags sitting in the shed, one great way to use stone pebbles for the garden is to create a pebble mosaic. With a handful of supplies and a few easy steps, this DIY project leaves you with a masterpiece that looks professionally done!
What can I use a pebble mosaic for?
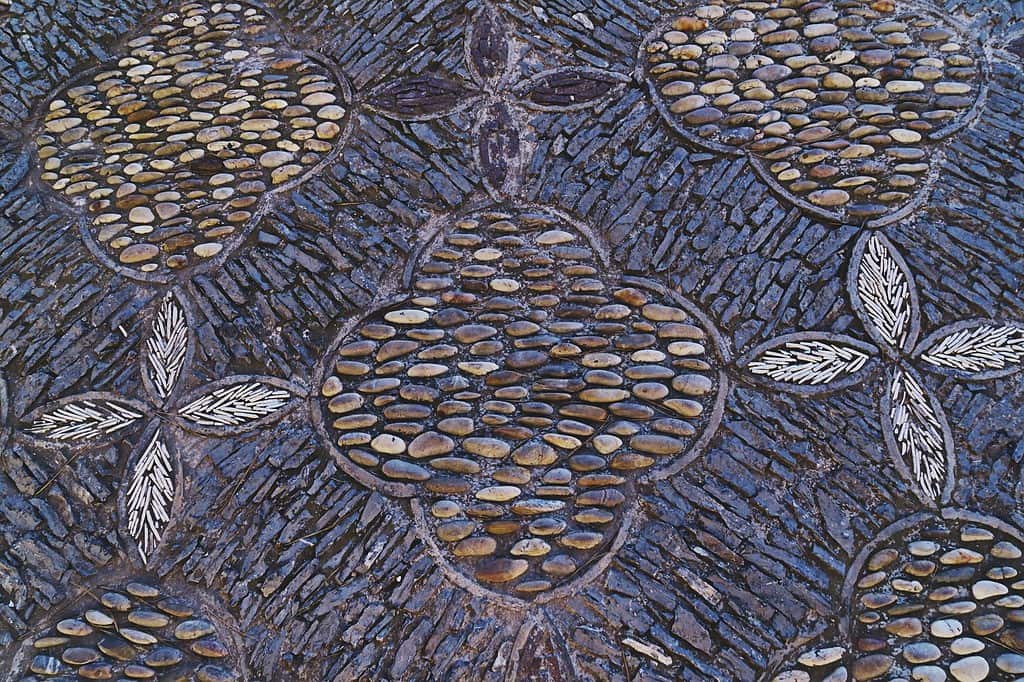
This is meant to be an eye-catching decorative stone piece that sets your garden apart from the rest. Here are some ways you can implement a garden stone mosaic into your landscaping design.
- Pebble mosaic garden path
- Pottery decorations
- Wall art
- Stone garden
- Concrete bench decor
- Concrete patio decor
- A centerpiece for an outdoor sitting area
What kind of pebbles do I need for a mosaic?
The short answer is: any pebble or stone will do. You might want to contrast black pebbles with white pebbles for garden areas, or even add glow in the dark pebbles to a walkway for a glowing guide to help visitors tread safely at night.
No matter what type of pebbles you decide to use, the first order of business is to sort them by size and color, storing them in buckets.
Pro tip: Wet your garden stones first to really bring out the colors and patterns.
How to make a pebble mosaic
Here’s what you’ll need besides the landscaping pebbles you’ve already sorted.
- Sand
- Scrap plywood
- Paver base
- Stone dust
- Dry concrete mix
- Topping mix (grout)
Day 1:
Start by drawing out your mosaic design. Set out the scrap plywood to make a box shape (it should be the size you envision for your mosaic).
Fill this box with 3 inches of sand (this is for support). Layout your pebbles in the design you want. Make sure the stones are packed tightly together and are set in different directions (laying/standing).
When satisfied, take a picture of your pebble mosaic and jot down the dimensions.
Day 2:
It’s time to prep the area or pathway where you wish to create a pebble mosaic. Dig at least 1 foot wider than your original dimensions on the sides and up to 8 inches deep.
Pro tip: Choose an area of your garden that is slightly raised, so when it rains the water can drain instead of pooling where your stone mosaic is set.
After you’ve cleared the area, layer 6 inches of paver base, then 1 inch of stone dust. Add the dry concrete in the center of the area and use a flat piece of plywood to smooth out the concrete to make a 2-inch layer.
Mist the concrete with your garden hose until it is a crumbly texture, resembling dirt. Layout your garden pebbles, burying at least ⅓ of each stone in the cement.
Remember to pack them together tightly, just like when you practiced the design in the sand. After finishing a section, lay plywood over the top and tap it with a mallet to set the pebbles in place.
Once you’re finished, fill the gaps with dry cement, mist the entire area once more, cover it with a tarp and let it sit overnight.
Day 3:
Use a topping mix (grout) to cover the surface of the mosaic, using a paintbrush to spread it out between the stones. Once finished, mist it with your hose and let it cure for 30 minutes to 1 hour. At this point, you can use a stiff brush to shape it further.
Pro tip: Add more grout to parts of the mosaic that will receive a lot of wear and tear. The more you add, the harder the stones will set.
If you are happy with your mosaic, cover it with a tarp and let it cure. It can take up to 2 weeks to fully cure, at which point you can uncover your beautiful pebble mosaic.
Finally, you’ll need to know how to clean your garden pebbles mosaic before you can enjoy it in all of its splendor. Use a damp rag and wipe away excess cement to bring out the color and natural sheen.


61 Comments
-
Marshall
I don’t even know how I ended up here, but I thought this post was
good. I do not know who you are but definitely you’re going to
a famous blogger if you are not already ;) Cheers! -
Nona
Attractive section of content. I just stumbled upon your site and in accession capital to
assert that I get in fact enjoyed account your blog posts.
Any way I will be subscribing to your augment and even I achievement you access consistently rapidly. -
Belle
I think that everything said made a lot of sense.
But, what about this? what if you composed a catchier post title?
I ain’t saying your content is not solid., however what if you
added a headline that makes people want more? I mean How to Make a Beautiful Pebble Mosaic
in Your Garden | Margo Garden Products is kinda plain. You
should look at Yahoo’s home page and note how they create post titles to grab people to open the links.
You might add a video or a related pic or two to grab people interested about what you’ve got to say.Just my opinion, it would make your website a little livelier.
-
Jerome
You have made some really good points there. I looked on the internet to find out more about the issue and found
most people will go along with your views on this web site. -
Gilda
I truly love your website.. Pleasant colors & theme.
Did you develop this amazing site yourself? Please reply back as I’m attempting to create my very own blog and would love to learn where you got this
from or exactly what the theme is called. Many thanks! -
Alberto
I am sure this article has touched all the internet users, its
really really nice paragraph on building up new weblog. -
Www.google.com.mm
What a stuff of un-ambiguity and preserveness of precious know-how on the topic of
unexpected feelings. -
reference Porsche Taycan Side Profile
Wonderful beat ! I would like to apprentice while you amend your site, how could i subscribe for a
weblog site? The account helped me a appropriate deal.
I were a little bit familiar of this your broadcast provided shiny clear
concept -
see post Taycan Porsche Wiki
I’m truly enjoying the design and layout of your site. It’s a very easy on the
eyes which makes it much more enjoyable for me to
come here and visit more often. Did you hire out a developer to create your theme?
Outstanding work! -
check that Ways To Stop Receding Gums
magnificent post, very informative. I’m wondering why the opposite experts of this sector do not understand this.
You should continue your writing. I’m confident, you have a huge readers’ base already! -
resource Taycan Porsche Concept
I like what you guys are up too. Such clever work and
exposure! Keep up the very good works guys I’ve added you guys to blogroll. -
more info here Porsche Battery Power Taycan
Howdy just wanted to give you a quick heads up. The words in your post seem to
be running off the screen in Chrome. I’m not sure if this is
a formatting issue or something to do with internet browser compatibility but
I figured I’d post to let you know. The design look great though!Hope you get the problem solved soon. Cheers
-
i thought about this Porsche Taycan Turbo S 0-60
Thanks for the good writeup. It in truth was once a entertainment account it.
Glance advanced to far delivered agreeable
from you! By the way, how can we keep up a correspondence? -
cheap flights
Ahaa, its pleasant conversation about this paragraph
at this place at this blog, I have read all that,
so now me also commenting here. -
cheap flights
What’s Going down i’m new to this, I stumbled upon this I have discovered It positively helpful
and it has aided me out loads. I hope to give a contribution & help different customers like
its aided me. Great job. -
Veronica
Incredible points. Great arguments. Keep up the amazing work.
-
Anne
For hottest information you have to visit world wide web and on world-wide-web I found this web
site as a most excellent website for hottest updates. -
Arthur
Amazing blog! Is your theme custom made or did you download it from somewhere?
A design like yours with a few simple adjustements would really make my blog jump out.
Please let me know where you got your design. Cheers -
calon.top
Usually I do not read article on blogs, but I would
like to say that this write-up very forced me to take a look at and do so!
Your writing taste has been amazed me. Thank you, very great article. -
Jamal
It’s truly very difficult in this full of activity life to listen news on TV,
thus I only use the web for that reason, and get the most
recent information. -
basics Regrowing Gums Tissue
I am really thankful to the owner of this website who has shared this enormous article
at here. -
Leilani
It’s hard to come by experienced people for this subject, however, you sound like you know what you’re talking about!
Thanks -
Click for source How To Regrow Your Gums Naturally
My brother suggested I might like this web site.
He was entirely right. This post truly made my day. You cann’t
imagine simply how much time I had spent for this information! Thanks! -
visit this web-site can your gums regenerate
Oh my goodness! Impressive article dude! Thanks, However I am going through difficulties with your RSS.
I don’t know the reason why I am unable to subscribe
to it. Is there anybody else getting the same RSS problems?
Anyone that knows the solution will you kindly respond?
Thanx!! -
Eleanore
Aw, this was a really nice post. Spending some time and
actual effort to make a great article… but what can I say… I
put things off a lot and don’t seem to get nearly anything done. -
Charity
Oh my goodness! Impressive article dude! Many thanks, However
I am encountering difficulties with your RSS.
I don’t know why I am unable to join it. Is there anybody else having similar RSS problems?
Anyone that knows the answer can you kindly respond? Thanx!! -
Sonja
Remarkable issues here. I am very happy to see your post.
Thank you a lot and I’m taking a look ahead to contact you.
Will you kindly drop me a mail? -
Fay
Hi to every one, since I am really keen of reading this webpage’s post to be updated regularly.
It carries good stuff. -
Merrill
Hi there! This is my first visit to your blog! We
are a team of volunteers and starting a new initiative in a
community in the same niche. Your blog provided us
beneficial information to work on. You have done a outstanding job! -
More Information Regrowing Gums At Home
Excellent article. Keep writing such kind of information on your
page. Im really impressed by your site.
Hello there, You’ve performed an excellent job. I’ll certainly digg it
and individually suggest to my friends. I’m confident they will be benefited from this website. -
online bets
With the NFL season approaching we evaluation the greatest new football betting web pages.
-
Aimee
Wow, marvelous weblog layout! How lengthy have you ever been running a
blog for? you make blogging look easy. The overall glance of
your website is excellent, as neatly as the content material! -
Vida
I pay a visit everyday some web pages and sites to
read articles or reviews, except this blog gives quality based writing. -
Carroll
Asking questions are actually good thing if you are not understanding anything
totally, except this paragraph presents pleasant understanding even. -
Aida
Hey there are using WordPress for your site platform?
I’m new to the blog world but I’m trying to get started
and set up my own. Do you require any html coding expertise to make your own blog?
Any help would be greatly appreciated! -
Lavon
I’m not that much of a internet reader to be honest but your blogs really nice, keep
it up! I’ll go ahead and bookmark your website to come back later.
Cheers -
Lorrine
Informative article, totally what I wanted to find.
-
Greta
May I simply just say what a comfort to find somebody who actually knows what
they’re talking about over the internet. You certainly know how to bring a problem to light and make it
important. More people should look at this
and understand this side of the story. I can’t believe you are not more popular since you most certainly possess the gift. -
Don
It’s really a nice and helpful piece of information. I’m satisfied
that you simply shared this usefulinfo with us.
Please stay us up to date like this. Thank you for sharing. -
Hildegard
Remarkable issues here. I’m very glad to peer your post.
Thank you so much and I am having a look ahead to contact you.
Will you kindly drop me a mail? -
Ginger
Great blog! Do you have any tips for aspiring writers?
I’m hoping to start my own blog soon but I’m a little lost on everything.
Would you propose starting with a free platform like WordPress or go for
a paid option? There are so many choices out there that I’m totally overwhelmed ..
Any suggestions? Thanks a lot! -
how to conduct A Thesis statement
I delight in, cause I found exactly what I was having a look for.
You’ve ended my four day long hunt! God Bless you man. Have a great day.
Bye -
icycoupons
After I originally commented I seem to have clicked the -Notify me when new comments are added- checkbox and from
now on every time a comment is added I recieve four emails
with the same comment. Is there an easy method
you are able to remove me from that service? Thanks! -
0mniartist
Hi just wanted to give you a brief heads up and let you know a few of
the images aren’t loading properly. I’m not sure why but I think
its a linking issue. I’ve tried it in two different browsers and
both show the same results. asmr 0mniartist -
Amelie
hello!,I like your writing so much! percentage we be in contact more about your post on AOL?
I require an expert in this house to resolve my problem.
May be that’s you! Having a look ahead to look you. -
Wholesale Stone Solutions
It’s good to know that colored rocks and pebbles can be put around the base of a tree that matches a garden. I want to get some colored rocks to put in our backyard around some trees and to hide some of our drains. I’ll be sure to find some rocks that match the aesthetic with the rest of the yard.
-
the gamefly
Howdy, i read your blog from time to time and i
own a similar one and i was just curious if you get a lot of spam feedback?
If so how do you prevent it, any plugin or anything you can suggest?
I get so much lately it’s driving me insane so any support is
very much appreciated. -
asmr an
Very nice post. I simply stumbled upon your weblog and wished
to say that I have really loved browsing your weblog posts.After all I’ll be subscribing for your rss feed and I hope you write again soon!
-
Terri
My relatives always say that I am killing my time here at web,
but I know I am getting know-how all the time by reading such good posts. -
Aleida
Hi, i believe that i saw you visited my website so i came to go back the favor?.I
am attempting to in finding issues to improve my site!I assume its adequate to
use some of your ideas!! -
Kelsey
Hi everyone, it’s my first pay a quick visit at this web
page, and piece of writing is genuinely fruitful for me, keep up posting these content. -
Ariel
I loved as much as you’ll receive carried out right here.
The sketch is tasteful, your authored subject matter stylish.nonetheless, you command get got an impatience over
that you wish be delivering the following. unwell unquestionably come further formerly again since exactly the same nearly very often inside case you shield this
hike. -
Henrietta
Good post. I learn something new and challenging on sites I stumbleupon everyday.
It will always be exciting to read through articles from
other authors and use something from their web sites. -
Mack
I know this web page provides quality depending articles and other data, is there any other site
which offers these kinds of data in quality? -
Logan
It’s very simple to find out any matter
on web as compared to books, as I found this
article at this website. -
pornodom.top
Respect to post author, some fantastic information
-
Olive Fabinyi
Hello margogardenproducts.com webmaster, Your posts are always well organized and easy to understand.
-
Rubye Gertz
To the margogardenproducts.com webmaster, Your posts are always well presented.
-
Susie McClusky
Hello margogardenproducts.com owner, Thanks for the well-organized post!
-
gralion torile
After I initially commented I clicked the -Notify me when new feedback are added- checkbox and now each time a comment is added I get four emails with the identical comment. Is there any manner you can take away me from that service? Thanks!


Maybelle
Have you ever considered about adding a little
bit more than just your articles? I mean, what you say is fundamental and all.
However just imagine if you added some great visuals or videos to give your posts
more, “pop”! Your content is excellent but with images and
videos, this site could certainly be one of the greatest in its niche.
Awesome blog!